Quantcast
Channel: Live News for Yii Framework
Viewing all 3361 articles
Browse latest View live

[extension] yarcode/yii2-queue-mailer

$
0
0

Queue mailer decorator for Yii2 framework

  1. Installation
  2. Usage

Send your emails in the background using Yii2 queues.

Build Status Latest Stable Version Total Downloads License

Installation

The preferred way to install this extension is through composer.

Either run

php composer.phar require --prefer-dist yarcode/yii2-queue-mailer

or add

"yarcode/yii2-queue-mailer": "*"

Usage

Configure queue component of your application. You can find the details here: https://www.yiiframework.com/extension/yiisoft/yii2-queue

Configure YarCode\Yii2\QueueMailer\Mailer as your primary mailer. ` 'mailer' => [

  'class' => \YarCode\Yii2\QueueMailer\Mailer::class,
  'syncMailer' => [
      'class' => \yii\swiftmailer\Mailer::class,
      'useFileTransport' => true,
  ],

], Now you can send your emails as usual. $message = \Yii::$app->mailer->compose() ->setSubject('test subject') ->setFrom('test@example.org') ->setHtmlBody('test body') ->setTo('user@example.org');

\Yii::$app->mailer->send($message); `


[extension] powerkernel/yii-aws-sns

$
0
0

yii-aws-sns

  1. Installation
  2. Usage

Amazon Simple Notification Service for Yii 2.1

Latest Stable Version Total Downloads GitHub license

Installation

The preferred way to install this extension is through composer.

Either run

php composer.phar require powerkernel/yii-aws-sns "*"

or add

"powerkernel/yii-aws-sns": "*"

to the require section of your composer.json file.

Usage

To use this extension, simply add the following code in your application configuration: ` 'components' => [ // ... 'sns' => [

        '__class' => powerkernel\sns\AwsSns::class,
        'key' => 'your aws sns key',
        'secret' => 'your aws sns secret',
    ],

// ...
], You can then call AWS SNS functions as follows: Yii::$app->sns->client->publish($arg); // ... ` For further instructions refer to the AWS Documentation page

[extension] izumi-kun/yii2-longpoll

$
0
0

Yii2 longpoll

  1. Installation
  2. Basic Usage
  3. Example
  4. License

Implements long polling AJAX mechanism.

Latest Stable Version Total Downloads Build Status Scrutinizer Code Quality Code Coverage

Installation

The preferred way to install this extension is through composer.

Either run

php composer.phar require --prefer-dist izumi-kun/yii2-longpoll

or add

"izumi-kun/yii2-longpoll": "~1.0.0"

to the require section of your composer.json.

Basic Usage

Controller
class SiteController extends Controller
{
    public function actions()
    {
        return [
            'polling' => [
                'class' => LongPollAction::class,
                'events' => ['eventId'],
                'callback' => [$this, 'longPollCallback'],
            ],
        ];
    }
    public function longPollCallback(Server $server)
    {
        $server->responseData = 'any data';
    }
}
View
LongPoll::widget([
    'url' => ['site/polling'],
    'events' => ['eventId'],
    'callback' => 'console.log',
]);
Model
\izumi\longpoll\Event::triggerByKey('eventId');

Example

https://github.com/Izumi-kun/yii2-longpoll-example

License

BSD-3-Clause

[extension] gevman/yii2-router

[extension] devanych/yii2-cart

$
0
0

Yii2 shopping cart

  1. Installation
  2. Configuration
  3. Usage
  4. Useful links

This extension adds shopping cart for Yii framework 2.0

Installation

The preferred way to install this extension is through Composer

Either run

php composer.phar require devanych/yii2-cart "*"

or add

devanych/yii2-cart: "*"

to the require section of your composer.json file.

Configuration

Configure the cart component (default values are shown):

return [
    //...
    'components' => [
        //...
        'cart' => [
            'class' => 'devanych\cart\Cart',
            'storageClass' => 'devanych\cart\storage\SessionStorage',
            'calculatorClass' => 'devanych\cart\calculators\SimpleCalculator',
            'params' => [
                'key' => 'cart',
                'expire' => 604800,
                'productClass' => 'app\model\Product',
                'productFieldId' => 'id',
                'productFieldPrice' => 'price',
            ],
        ],
    ]
    //...
];

In addition to devanych\cart\storage\SessionStorage, there is also devanych\cart\storage\CookieStorage and devanych\cart\storage\DbSessionStorage. It is possible to create your own storage, you need to implement the interface devanych\cart\storage\StorageInterface.

DbSessionStorage uses SessionStorage for unauthorized users and database for authorized.

If you use the devanych\cart\storage\DbSessionStorage as storageClass then you need to apply the following migration:

php yii migrate --migrationPath=@vendor/devanych/yii2-cart/migrations

devanych\cart\calculators\SimpleCalculator produces the usual calculation of the total cost and total quantity of items in the cart. If you need to make a calculation with discounts or something else, you can create your own calculator by implementing the interface devanych\cart\calculators\CalculatorInterface.

Setting up the params array:

  • key - For Session and Cookie.

  • expire - Cookie life time.

  • productClass - Product class is an ActiveRecord model.

  • productFieldId - Name of the product model id field.

  • productFieldPrice - Name of the product model price field.

Usage

You can get the shopping cart component anywhere in the app using Yii::$app->cart.

Using cart:

// Product is an AR model
$product = Product::findOne(1);

// Get component of the cart
$cart = \Yii::$app->cart;

// Add an item to the cart
$cart->add($product, $quantity);

// Adding item quantity in the cart
$cart->plus($product->id, $quantity);

// Change item quantity in the cart
$cart->change($product->id, $quantity);

// Removes an items from the cart
$cart->remove($product->id);

// Removes all items from the cart
$cart->clear();

// Get all items from the cart
$cart->getItems();

// Get an item from the cart
$cart->getItem($product->id);

// Get ids array all items from the cart
$cart->getItemIds();

// Get total cost all items from the cart
$cart->getTotalCost();

// Get total count all items from the cart
$cart->getTotalCount();

Using cart items:

// Product is an AR model
$product = Product::findOne(1);

// Get component of the cart
$cart = \Yii::$app->cart;

// Get an item from the cart
$item = $cart->getItem($product->id);

// Get the id of the item
$item->getId();

// Get the price of the item
$item->getPrice();

// Get the product, AR model
$item->getProduct();

// Get the cost of the item
$item->getCost();

// Get the quantity of the item
$item->getQuantity();

// Set the quantity of the item
$item->setQuantity($quantity);

By using method getProduct(), you have access to all the properties and methods of the product.

$product = $item->getProduct();

echo $product->name;

Useful links

Article with a detailed description in Russian language: https://zyubin.ru/frameworks/yii/rasshirenie-korzina-dlya-yii2.html

[extension] faboslav/yii2-material-tabs

$
0
0
  1. Installation
  2. Preview
  3. Usage
  4. Licence

Installation

The preferred way to install this extension is through composer.

Either run

$ php composer.phar require faboslav/yii2-material-tabs "dev-master"

or add

"faboslav/yii2-material-tabs": "dev-master"

to the `require` section of your composer.json file.

Preview

MaterialTabsPreview

Usage

MaterialNavBar
use faboslav\materialtabs\MaterialTabs

echo MaterialTabs::widget([
    'items' => [
        [
            'label' => '<i class="material-icons">home</i>',
            'content' => 'Tab one content.'
        ],
        [
            'label' => 'Tab two',
            'content' => 'Tab two content<br><br>Text<br><br>Text',
        ],
        [
            'label' => 'Tab three',
            'content' => 'Tab three content<br>Text<br>Text',
            'active' => true
        ],
        [
            'icon' => '<i class="material-icons">people</i>',
            'label' => 'Tab four',
            'content' => 'Tab four content<br><br>Text<br>Text'
        ],
        [
            'label' => 'Tab five',
            'content' => 'Tab five content<br>Text'
        ],
    ]
]);

Licence

The MIT License (MIT)

[extension] netesy/yii2-bulksms

$
0
0

A Yii2 extension to handle sending messages for most Nigerian bulksms http api connections

  1. Installation
  2. Supported websites
  3. Usage

A Yii2 extension to handle sending messages for most Nigerian bulksms http api connections

Installation

The preferred way to install this extension is through composer.

Either run

php composer require netesy/yii2-bulksms

or add

"netesy/yii2-bulksms": "*"

to the require section of your composer.json file.

Supported websites

NigerianBulkSMS

BetaSMS

Usage

Once the extension is installed, simply use it in your code by :

first add to config.php `php <?php 'components' => [

'bulksms' => [
      'class' => 'netesy\bulksms\BulkSms',
      'username' => 'xxxxxxxx',
      'password' => 'xxxxxxxx',
      'sender' => 'sender number',
      'url' => 'the api address',
      ],

] ?> `

Once the extension is installed, simply use it in your code by : to send a message `php <?php

Yii::$app->bulksms->sendMessage([
'number' => $number,
'message' => 'message',
  ]);

?> to send a callphp <?php

Yii::$app->bulksms->sendCall([
'number' => $number,
'message' => 'message',
  ]);

?> `

to get your account balance

<?php 
	Yii::$app->bulksms->getBalance();
 ?>

[extension] olegsoft/first-or-create

$
0
0

Trait For Yii2 ActiveRecord

  1. The idea is borrowed from Laravel framework.
  2. Installation
  3. Inserting into the ActiveRecord class
  4. Example of use

The idea is borrowed from Laravel framework.

Installation

The preferred way to install this extension is through composer.

php composer.phar require --prefer-dist olegsoft/first-or-create "dev-master"

Inserting into the ActiveRecord class

use olegsoft\firstOrCreate\FirstOrCreate;

class ModelTable extends \yii\db\ActiveRecord
{
    use FirstOrCreate;
    ...

Example of use

use app\models\ModelTable;
    ...

    //public static function firstOrNew($attributes, $values = [])
    $model = ModelTable::firstOrNew(['id' => 50]);
    $model = ModelTable::firstOrNew(['id' => 50], ['sort' => 10]);
    //Returns a single of the ActiveRecord model instance that matches the values of the $attribute array values 
    //or returns a new instance of the ActiveRecord model 
    //with properties corresponding to the values of the $attributes array + values of the $values array
       
    //public static function firstOrCreate($attributes, $values = [])
    $model = ModelTable::firstOrCreate(['id' => 50]);
    $model = ModelTable::firstOrCreate(['id' => 50], ['sort' => 10]);
    //Returns a single of the ActiveRecord model instance that matches the values of the $attribute array values 
    //or returns a new instance of the ActiveRecord model 
    //with properties corresponding to the values of the $attributes array + values of the $values array and save it
    
    //public static function updateOrCreate($attributes, $values = [])
    $model = ModelTable::updateOrCreate(['id' => 50]);
    $model = ModelTable::updateOrCreate(['id' => 50], ['sort' => 10]);
    //Finds the model from the passed attributes,
    //if the model is found, then assign the values of the $values and save it
    //if the model is not found, then create it with the values $attributes + $value and save it

    //public static function firstOrFail($attributes)
    $model = ModelTable::firstOrFail(['id' => 50]);
    //Return the model with the passed attributes, if the model is not found, then the HTTP 404 exception will be thrown

    //public static function findOrFail($attributes)
    $models = ModelTable::findOrFail(['id' => 50]);
    //Returns array of models by the passed attributes, if no model is found, then the HTTP 404 exception will be thrown
    
...

[extension] bitcko/yii2-bitcko-google-calendar-api

$
0
0

Yii2 Bitcko Google Calendar Api Extension

  1. Installation
  2. Usage

Yii2 Bitcko Google Calendar Api Extension use to create and delete events from google calendar

Installation

The preferred way to install this extension is through composer.

Either run

php composer.phar require bitcko/yii2-bitcko-google-calendar-api:dev-master

or add

"bitcko/bitcko/yii2-bitcko-google-calendar-api": "dev-master"

to the require section of your composer.json file.

Usage

Once the extension is installed, simply use it in your code by :

  1. Download client_secret.json file from Google Developer Console.
  2. Move the client_secret.json to app/web dir.
  3. Controller example
<?php

namespace app\controllers;
use yii\helpers\Url;
use yii\web\Controller;

use bitcko\googlecalendar\GoogleCalendarApi;

/**
 * GoogleApi controller.
 *
 * @package app\controllers
 * @author  Mhmd Backer shehadi (bitcko) <www.bitcko.com>

 */
class GoogleApiController extends Controller
{


    public function actionAuth(){

        $redirectUrl = Url::to(['/google-api/auth'],true);
        $calendarId = 'primary';
        $username="any_name";
        $googleApi = new GoogleCalendarApi($username,$calendarId,$redirectUrl);
        if(!$googleApi->checkIfCredentialFileExists()){
            $googleApi->generateGoogleApiAccessToken();
        }
        \Yii::$app->response->data = "Google api authorization done";
    }
    public function actionCreateEvent(){
        $calendarId = 'primary';
        $username="any_name";
        $googleApi = new GoogleCalendarApi($username,$calendarId);
        if($googleApi->checkIfCredentialFileExists()){
            $event = array(
                'summary' => 'Google I/O 2018',
                'location' => '800 Howard St., San Francisco, CA 94103',
                'description' => 'A chance to hear more about Google\'s developer products.',
                'start' => array(
                    'dateTime' => '2018-06-14T09:00:00-07:00',
                    'timeZone' => 'America/Los_Angeles',
                ),
                'end' => array(
                    'dateTime' => '2018-06-14T17:00:00-07:00',
                    'timeZone' => 'America/Los_Angeles',
                ),
                'recurrence' => array(
                    'RRULE:FREQ=DAILY;COUNT=2'
                ),
                'attendees' => array(
                    array('email' => 'lpage@example.com'),
                    array('email' => 'sbrin@example.com'),
                ),
                'reminders' => array(
                    'useDefault' => FALSE,
                    'overrides' => array(
                        array('method' => 'email', 'minutes' => 24 * 60),
                        array('method' => 'popup', 'minutes' => 10),
                    ),
                ),
            );

           $calEvent = $googleApi->createGoogleCalendarEvent($event);
            \Yii::$app->response->data = "New event added with id: ".$calEvent->getId();
        }else{
            return $this->redirect(['auth']);
        }
    }


    public function actionDeleteEvent(){
        $calendarId = 'primary';
        $username="any_name";
        $googleApi = new GoogleCalendarApi($username,$calendarId);
        if($googleApi->checkIfCredentialFileExists()){
            $eventId ='event_id' ;

             $googleApi->deleteGoogleCalendarEvent($eventId);
            \Yii::$app->response->data = "Event deleted";
        }else{
            return $this->redirect(['auth']);
        }
    }

    public function actionCalendarsList(){
        $calendarId = 'primary';
        $username="any_name";
        $googleApi = new GoogleCalendarApi($username,$calendarId);
        if($googleApi->checkIfCredentialFileExists()){
          $calendars =    $googleApi->calendarList();
            \Yii::$app->response->format = \yii\web\Response::FORMAT_JSON;
            \Yii::$app->response->data = $calendars;
        }else{
            return $this->redirect(['auth']);
        }
    }

}


[extension] inquid/yii2-tensorflow-js

$
0
0

Tensorflow JS Yii2 integration

  1. Installation
  2. Usage

Widgets and useful stuff to use tensorflow js on Yii2 alt text

Installation

The preferred way to install this extension is through composer.

Either run

php composer.phar require --prefer-dist inquid/yii2-tensorflow-js "*"

or add

"inquid/yii2-tensorflow-js": "*"

to the require section of your composer.json file.

Usage

Once the extension is installed, simply use it in your code by :

<?= \inquid\tensoflowjs\TensorflowWidget::widget(); ?>```

[extension] timurmelnikov/yii2-loading-overlay

$
0
0

Yii2 виджет-обертка для jQuery LoadingOverlay

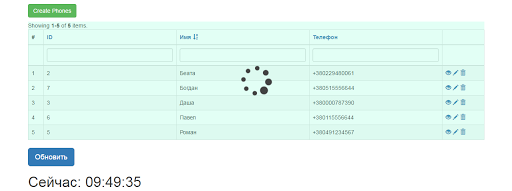
  1. Скриншоты
  2. Демонстрация работы
  3. Установка
  4. Использование
  5. Настройки

Latest Stable Version Latest Unstable Version Total Downloads License

Виджет предназначен для наложения картинки-лоадера на блок, при обработке Ajax запроса.

Скриншоты

Наименование Скриншот Настройки
Pjax с Gridview Pjax с Gridview'color'=> 'rgba(102, 255, 204, 0.2)', 'fontawesome' => 'fa fa-spinner fa-spin'
Pjax с произвольным блоком Pjax с произвольным блоком'color'=> 'rgba(255, 102, 255, 0.3)'

Демонстрация работы

Demo страничка jQuery LoadingOverlay

Установка

Запустить команду json php composer.phar require --prefer-dist timurmelnikov/yii2-loading-overlay "~1.0.0"

Добавить в секцию "require" файла composer.json: ` json {

"require": {
    "timurmelnikov/yii2-loading-overlay": "~1.0.0"
}

} ` После добавления, выполнить команду: composer update

Использование

Есть 2 способа использования:

1-й - просто подключаем jQuery LoadingOverlay к представлению

В представлении, где будет использоваться yii2-loading-overlay, подключить: php timurmelnikov\widgets\LoadingOverlayAsset::register($this);

Далее, использовать обычный JavaScript, для отображения/скрытия jQuery LoadingOverlay, руководствуясь документацией jQuery LoadingOverlay, например так: ` php <?php

//Код на JavaScript (heredoc-синтаксис) $script = <<< JS

//Настройки (можно не использовать, тогда - все по умолчанию)
$.LoadingOverlaySetup({
    color           : "rgba(0, 0, 0, 0.4)",
    maxSize         : "80px",
    minSize         : "20px",
    resizeInterval  : 0,
    size            : "50%"
});

//Наложение jQuery LoadingOverlay на элемент с ID #p0, при отправке AJAX-запроса
$(document).ajaxSend(function(event, jqxhr, settings){
    $("#p0").LoadingOverlay("show");
});

//Скрытие jQuery LoadingOverlay на элемент с ID #p0, после выполнения AJAX-запроса
$(document).ajaxComplete(function(event, jqxhr, settings){
    $("#p0").LoadingOverlay("hide");
});

JS;

//Подключение скрипта в представлении $this->registerJs($script, yii\web\View::POS_READY);

?> `

2-й - работа с Pjax

Класс LoadingOverlayPjax, является расширением стандартного yii\widgets\Pjax и наследует все его поведение.

В представлении, где будет использоваться Pjax, подключить: php use timurmelnikov\widgets\LoadingOverlayPjax;

Использовать, вместо стандартного Pjax, "оборачивая" в него, например GridView (Скриншот 1): ` php <?php LoadingOverlayPjax::begin([ 'color'=> 'rgba(102, 255, 204, 0.2)', 'fontawesome' => 'fa fa-spinner fa-spin' ]); ?>

<?= GridView::widget([
    'dataProvider' => $dataProvider,
    'filterModel' => $searchModel,
    'columns' => [
        ['class' => 'yii\grid\SerialColumn'],
        'id',
        'name',
        'phone',
        ['class' => 'yii\grid\ActionColumn'],
    ],
]); ?>

<?php LoadingOverlayPjax::end(); ?> `

Настройки

Для настроек, использовать публичные свойства класса LoadingOverlayPjax, например: ` php <?php LoadingOverlayPjax::begin([

'color'=> 'rgba(255, 255, 44, 0.8)', //Настраиваем цвет
'elementOverlay' => '#element'       //Картинка лоадера, наложится на DOM элемент с id="element"

]); ?> ... <?php LoadingOverlayPjax::end(); ?> `

Перечень настроек (свойств)
Свойство Описание
color Свойство CSS background-color в формате rgba()
fade Управление появлением / затуханием
fontawesome Классы иконок Font Awesome (необходим Font Awesome, например - https://github.com/rmrevin/yii2-fontawesome)
image URL картинки
imagePosition" Свойство CSS background-position, для настройки расположения изображения
maxSize Максимальный размер в пикселях
minSize Минимальный размер в пикселях
size Размер изображения в процентах
zIndex Свойство CSS z-index
elementOverlay Альтернативный DOM элемент наложения jQuery LoadingOverlay

Примечание: Свойство "fontawesome" , имеет более высокий преоритет, чем свойство "image". Если установлены 2 настройки "image" и "fontawesome", "image" - игнорируется, "fontawesome" - отображается.

[news] Yii adopts SemVer since version 3.0.0

$
0
0

Since version 3.0.0 Yii adopts SemVer versioning to achieve better predictability and compatibility with Composer.

Same will happen with extensions. They will adopt SemVer starting from next major versions.

SemVer is simple. Given a version number MAJOR.MINOR.PATCH, increment the:

  • MAJOR version when you make incompatible API changes,
  • MINOR version when you add functionality in a backwards-compatible manner, and
  • PATCH version when you make backwards-compatible bug fixes.

Yii 2.0.x versioning stays as is.

[extension] motion/yii2-language-provider

$
0
0

Language provider interface

  1. Installation
  2. Usage
  3. Tests
  4. Licence

This package provides interface for language provider for accessing application languages from any storage for Yii2 Framework. It's allows to you create multi-language modules for using in Yii2 based application. As example of integration to module you can see yii2-email-template extension.

Build Status Scrutinizer Code Quality Total Downloads Latest Stable Version Latest Unstable Version

From the box you can use:

If you want to create your implementation of language provider you should implement interface motion\i18n\LanguageProviderInterface.

Installation

The preferred way to install this extension is through composer.

Either run

$ composer require motion/yii2-language-provider

or add

"motion/yii2-language-provider": "~2.1"

to the require section of your composer.json.

Usage

Config language provider
Option Description Type Default
languages Should contains list of application languages. array []
defaultLanguage Should contains default application language. array []
Example
$config = [
    'languages' => [
        [
            'label' => 'English',
            'locale' => 'en',
        ],
        [
            'label' => 'Ukrainian',
            'locale' => 'uk',
        ],
        [
            'label' => 'Russian',
            'locale' => 'ru',
        ],
    ],
    'defaultLanguage' => [
        'label' => 'English',
        'locale' => 'en',
    ],
];

$provider = new \motion\i18n\ConfigLanguageProvider($config);
$provider->getLanguages(); // returns list of languages
$provider->getDefaultLanguage(); // returns default language
$provider->getLanguageLabel('en'); // returns language label by locale (`English`)
Database language provider
Option Description Type Default
db Database connection instance. string, array, \yii\db\Connection db
tableName Name of language entity in database. string language
localeField Name of locale field in language entity. string locale
labelField Name of label field in language entity. string label
defaultField Name of field in table with default language flag. string is_default
Example
$config = [
    'db' => 'secondDb',
    'labelField' => 'title',
];
$provider = new \motion\i18n\DbLanguageProvider($config);
$provider->getLanguages(); // returns list of languages
$provider->getDefaultLanguage(); // returns default language
$provider->getLanguageLabel('uk'); // returns language label by locale

Tests

You can run tests with composer command

$ composer test

or using following command

$ codecept build && codecept run

Licence

License

This project is released under the terms of the BSD-3-Clause license.

Copyright (c) 2017-2018, Motion Web Production

[extension] slavkovrn/yii-prettyphoto

$
0
0

PrettyPhoto image galary widget for Yii 1 Framework

  1. Installation
  2. Usage

The extension uses jQuery PrettyPhoto and makes image galary from php array of structure defined.

PrettyPhoto image galary PHP Array generator.

PrettyPhoto image galary

Installation

The preferred way to install this extension is through composer.

Either run:

composer require slavkovrn/yii-prettyphoto:dev-master

or add

"slavkovrn/yii-prettyphoto": "dev-master"

to the require section of your composer.json file.

Usage

Set link to extension in your view:

<?php $this->widget(slavkovrn\prettyphoto\PrettyPhotoWidget::class,[
    'id'     =>'prettyPhoto',   // id of plugin should be unique at page
    'images' => [               // images at popup window of prettyPhoto galary
        1 => [
                'src' => 'http://yii2.kadastrcard.ru/uploads/prettyphoto/image1.jpg',
                'thumb' => 'http://yii2.kadastrcard.ru/uploads/prettyphoto/image1.jpg',
                'title' => 'Image visible in widget',
            ],
        2 => [
                'src' => 'http://yii2.kadastrcard.ru/uploads/prettyphoto/image2.jpg',
                'thumb' => 'http://yii2.kadastrcard.ru/uploads/prettyphoto/image2.jpg',
                'title' => 'image 1',
            ],
        3 => [
                'src' => 'http://yii2.kadastrcard.ru/uploads/prettyphoto/image3.jpg',
                'thumb' => 'http://yii2.kadastrcard.ru/uploads/prettyphoto/image3.jpg',
                'title' => 'image 2',
            ],
        4 => [
                'src' => 'http://yii2.kadastrcard.ru/uploads/prettyphoto/image4.jpg',
                'thumb' => 'http://yii2.kadastrcard.ru/uploads/prettyphoto/image4.jpg',
                'title' => 'image 3',
            ],
    ]
]); ?>

write comments to admin

[extension] microinginer/yii2-cbrf-rates

$
0
0

yii2-cbrf-rates

Экстеншен yii2 для получения курса валют в рублях. Источник данных Центробанк Российской Федерации

Установка

Предпочтительный способ установки composer.

Запустите комманду

php composer.phar require --prefer-dist microinginer/yii2-cbrf-rates "dev-master"

или добавьте

"microinginer/yii2-cbrf-rates": "dev-master"

в раздел require в вашем composer.json файле.

В конфигурационном файле добавляем: `php $config = [

...
'components' => [
    ...
    'CbRF' => [
        'class' => 'microinginer\CbRFRates\CBRF',
        'defaultCurrency' => "EUR"
    ],
    ...
]
...

] `

Примеры работы

// ------------------------------------------------------------------------------------------------------------------------
// Вызов метода all() без вызова других методов возврошает все курсы на текущее время
print_r(Yii::$app->CbRF->all());
/*
Результат работы

Array
(
    ...
    [USD] => Array
        (
            [name] => Доллар США
            [value] => 59.7665
            [char_code] => USD
            [num_code] => 840
            [nominal] => 1
            [id] => R01235
        )
    ...
)
*/
// ------------------------------------------------------------------------------------------------------------------------

// ------------------------------------------------------------------------------------------------------------------------
// Вызов метода one() без вызова других методов возврошает курс по умолчаню, указанный в конфиге
print_r(Yii::$app->CbRF->one());

/*
//Результат работы
Array
(
    [name] => Евро
    [value] => 65.9882
    [char_code] => EUR
    [num_code] => 978
    [nominal] => 1
    [id] => R01239
)
*/
// ------------------------------------------------------------------------------------------------------------------------

// ------------------------------------------------------------------------------------------------------------------------
// Возвращает все курсы валют для указанной даты
print_r(Yii::$app->CbRF->filter(['date' => time()-(86400*7)]))->all(); 
// ------------------------------------------------------------------------------------------------------------------------

// ------------------------------------------------------------------------------------------------------------------------
// Возвращает курс валюты по умолчанию для указанной даты
print_r(Yii::$app->CbRF->filter(['date' => time()-(86400*7)]))->one(); 
// ------------------------------------------------------------------------------------------------------------------------

// ------------------------------------------------------------------------------------------------------------------------
// Возврощает все курсы валют указанный в параметре currency
print_r(Yii::$app->CbRF->filter(['currency' => 'usd, aud, eur']))->all(); 
// ------------------------------------------------------------------------------------------------------------------------

// ------------------------------------------------------------------------------------------------------------------------

//Вызов метода short()
print_r(Yii::$app->CbRF->short()->all());
/*
Резлуьтат запроса
Array
(
    ...
    [HUF] => 0.21349
    [DKK] => 8.8581
    [USD] => 59.7665
    [EUR] => 65.9882
    [INR] => 0.93502
    [KZT] => 0.318891
    [CAD] => 46.1304
    ...
)
*/
// ------------------------------------------------------------------------------------------------------------------------

// ------------------------------------------------------------------------------------------------------------------------
// Пример получения динамики котировок 
print_r(
    Yii::$app
        ->CbRF
        ->filter(['currency' => 'usd, aud, eur']))
        ->withDynamic(['date_from' => '20.05.2015', 'date_to' => '25.05.2015'])
        ->all()
); 
/*
//Резлуьтат запроса
Array
(
    ...
    [USD] => Array
        (
            [name] => Доллар США
            [value] => 59.7665
            [char_code] => USD
            [num_code] => 840
            [nominal] => 1
            [id] => R01235
            [dynamic] => Array
                (
                    [0] => Array
                        (
                            [date] => 1432080000
                            [value] => 49.1777
                        )

                    [1] => Array
                        (
                            [date] => 1432166400
                            [value] => 49.7919
                        )

                    [2] => Array
                        (
                            [date] => 1432252800
                            [value] => 49.9204
                        )

                    [3] => Array
                        (
                            [date] => 1432339200
                            [value] => 49.7901
                        )

                )

        )
    ...
)
*/
// ------------------------------------------------------------------------------------------------------------------------

[extension] microinginer/yii2-dropdown-action-column

$
0
0

Alternative yii\grid\ActionColumn for yii2

  1. Default buttons
  2. Custom buttons
  3. Install

Russian readme

Default buttons

echo \yii\grid\GridView::widget([
    ...
    'columns'      => [
        ...
        [
            'class' => \microinginer\dropDownActionColumn\DropDownActionColumn::className(),
        ],
    ],
]);

alternative yii\grid\ActionColumn default buttons

Custom buttons

echo \yii\grid\GridView::widget([
    ...
    'columns'      => [
        ...
        [
            'class' => \microinginer\dropDownActionColumn\DropDownActionColumn::className(),
            'items' => [
                [
                    'label' => 'View',
                    'url'   => ['view'],
                ],
                [
                    'label' => 'Export',
                    'url'   => ['expert'],
                ],
                [
                    'label'   => 'Disable',
                    'url'     => ['disable'],
                    'linkOptions' => [
                        'data-method' => 'post'
                    ],
                ],
            ]
        ],
    ],
]);

alternative yii\grid\ActionColumn custom buttons

Install

The preferred way to install this extension is through composer.

Either run

php composer.phar require --prefer-dist microinginer/yii2-dropdown-action-column "dev-master"

or add

"microinginer/yii2-dropdown-action-column": "dev-master"

to the require section of your composer.json file.

[extension] zertex/yii2-avatar-generator

$
0
0

Avatar Generator

  1. Installation
  2. Configuration
  3. Using

Generate avatar for user by his name or file for Yii2.

Latest Stable Version Total Downloads

Installation

Install with composer:

composer require zertex/yii2-avatar-generator

or add

"zertex/yii2-avatar-generator": "*"

to the require section of your composer.json file.

Configuration

Add to common/config/main.php or config/web.php

'components' => [
    ...
    'avatar' => [
        'class' => 'zertex\avatar_generator\AvatarGenerator',
        'origin_image_path' => 'path_to_image_files',
        'cache_image_path' => 'path_to_image_files',
        'cache_url' => 'url_to_image_files',
        'size_width' => 300,            // default: 300
        'font' => 'path_to_ttf_font',   // default: Play-Bold // may use aliases
        'font_size' => 100,             // default: 100
        'salt' => 'random_salt',        // salt for image file names
    ],
],
  • origin_image_path - Folder for origin image with size_width sides width
  • cache_image_path - Folder for cache images with custom sides width
  • cache_url - Url to cache folder for images
  • size_width - [optional] Origin image side width. Default: 300
  • font - [optional] Path to TTF font file. Yii2 aliases ready. Default: Play-Bold.ttf
  • font_size - [optional] Font size. Default: 100
  • salt - Random garbage for images file name

Using

Simple use with default image resolution `html <?= Yii::$app->avatar->show('John Smith') ?> `

Image with 150 px sides `html <?= Yii::$app->avatar->show('John Smith', 150) ?> `

Image for existing file with default image resolution `html <?= Yii::$app->avatar->show('John Smith', null, '/path/JM_Avatar.jpg') ?> `

Image for existing file with 150 px sides `html <?= Yii::$app->avatar->show('John Smith', 150, '/path/JM_Avatar.jpg') ?> `

alt text

[extension] razonyang/yii2-log

$
0
0

Enhanced DB Target for Yii2 Log Component

  1. Installation
  2. Usage

I wrote this extension for resolving the following problems:

  1. The logs are chaotic, I cannot distinguish which logs are came from the same requests. It is hard to debug in concurrent scenarios.
  2. The yii\log\DbTarget does not provide rotate feature.

Installation

composer require --prefer-dist razonyang/yii2-log

Usage

The usage is similar to yii\log\DbTarget.

Configuration
[
    ...

    'components' => [
        ...
        'log' => [
            'targets' => [
                [
                    'class' => \razonyang\yii\log\DbTarget::class,
                    'levels' => ['error', 'warning'],
                    'logTable' => '{{%log}}',

                    // rotate settings
                    'rotateInterval' => 100000,
                    // rotate mutex settings
                    'rotateMutex' => 'mutex',
                    'rotateMutexKey' => 'log_rotate',
                    'rotateMutexAcquireTimeout' => 0,
                ],
            ],
        ],

        // mutex is required by log rotate.
        'mutex' => [
            'class' => \yii\mutex\FileMutex::class,
        ],
        ...
    ],

    ...

    // migrate and rotate settings for console application.
    'controllerMap' => [
        'migrate' => [
            'class' => \yii\console\controllers\MigrateController::class,
            'migrationPath' => [
                ...
                '@vendor/razonyang/yii2-log/src/migrations',
                ...
            ],
        ],
        'log' => [
            'class' => \razonyang\yii\log\LogController::class,
        ]
    ],

    ...
]
Migrate
./yii migrate
Rotate
./yii log/rotate

[extension] johnsnook/yii2-ip-filter

$
0
0

Ip filtering for Yii2

  1. Installation
  2. Free API Keys
  3. Customization
  4. Importing Existing Apache Access Logs
  5. Screenshots!

This extension gets the visitors ip address, logs the access and checks if it's blacklisted or whitelisted. If it's a blacklist ip address, it redirects them to a blowoff page.

Installation

1. Download

The preferred way to install this extension is through composer.

Either run

php composer.phar require --prefer-dist johnsnook/yii2-ip-filter "*"

or add

"johnsnook/yii2-ip-filter": "*"

to the require section of your composer.json file.

2. Configure

Once the extension is installed, add 'ipFilter' to the bootstrap section of your configuration file :

    'bootstrap' => [
        'log',
        'ipFilter',
    ],

Then add the bare-minimum module definition `php

'modules' => [
    ...
    'ipFilter' => [
        'class' => 'johnsnook\ipFilter\Module',
    ],
    ...
],

The routes are defined in the Module file as $urlRules.  These can also be redefined in the module definition.  By default, they look like this for prettyUrls:
```php
    'visitor' => '/ipFilter/visitor/index',
    'visitor/index' => '/ipFilter/visitor/index',
    'visitor/blowoff' => '/ipFilter/visitor/blowoff',
    'visitor/<id>' => 'ipFilter/visitor/view',
    'visitor/update/<id>' => 'ipFilter/visitor/update',
3. Update database schema

The last thing you need to do is updating your database schema by applying the migrations. Make sure that you have properly configured db application component and run the following command:

$ php yii migrate/up --migrationPath=@vendor/johnsnook/yii2-ip-filter/migrations

Free API Keys

1) For the map to render in Visitor view, you must have a MapQuest key. Go to https://developer.mapquest.com/plan_purchase/steps/business_edition/business_edition_free/register for a free API key. If you don't have this set, the map won't display.

2) Ipinfo.io limits the number of requests each day to 100 but with a key you can make 1000 a day. Go to https://ipinfo.io/signup for a free API key If you don't have this set, you'll be limited to 100 requests per day.

3) Proxycheck.io limits the number of requests each day to 100 but with a key you can make 1000 a day. Go to https://proxycheck.io/ for a free API key If you don't have this set, you'll be limited to 100 requests per day.

4) Whatismybrowser.com is serious business, so having an API is mandatory to use their service. Go to https://developers.whatismybrowser.com/api/signup/basic for a free API key, but be prepared to provide an "app name" and website. If you don't have this set, no data beyond the basic USER_AGENT string will be captured.

Customization

So, you should be able to go to `http://yoursit.biz/index.php?r=ipFilter/visitor/index``` or, if you have prettyUrl enabled, `http://yoursite.com/visitor``` and see the visitor index.

But you'll probably want to make your own views. If it was me, I'd copy the controller and views to your backend or basic controllers & views directories. But maybe there's some best practices way to do it.

I have left the layout empty so that the pages should be rendered with your layouts/theme.

When you're done getting all your keys, and deciding that there are some controller actions you're not interested in tracking, your module configuration might look something like this: `php

'modules' => [
    ...
    'ipFilter' => [
        'class' => 'johnsnook\ipFilter\Module',
        'ipInfoKey' => 'Not a real key, obviously',
        'proxyCheckKey' => 'Not a real key, obviously',
        'mapquestKey' => 'Not a real key, obviously',
        'blowOff' => 'site/nope',
        'ignorables' => [
            'acontroller' => ['ignore-me', 'ignore-that'],
            'whitelist' => ['127.0.0.1', '24.99.155.86']
        ]
    ],
    ...
],
As you see, you can add a custom 'blowoff' controller action.  The visitor will be passed in so you can display the name and blowoff message.

A couple of things to note here about the 'ignorables' configuration array.  You can add a controller and actions to ignore as well as a whitelist of IP addresses to ignore.  These will not be added to the access log.

Usage
-----


If you want to find out information on the current user, you can get the visitor model from the module and use it like so:
```php
    $visitor = \Yii::$app->getModule('ipFilter')->visitor;
    // give a special hello to people in Atlanta or your ex wife
    if ($visitor->info->city === 'Atlanta' || $visitor->info->ip_address === '99.203.4.238') {
        echo "Your city sucks balls";
    }

Importing Existing Apache Access Logs

To kickstart your visitor data, you can import apache2 logs, as long as you (not www-data) have permissions to view them and they are in the standard apache format.

This is achieved via the very excellent parser library which can be found at https://github.com/kassner/log-parser.

By default, it assumes that your access logs are at '/etc/httpd/logs' since that's where mine are. You can specify another path as the first argument.

The second argument is for specifying which files you'd like to import. By default, it looks for access*. but a comma delimted list with no spaces can be provided instead.

# The default, looks for /etc/httpd/logs/access*
php yii ipFilter/import/logs

# Looks for /my/own/private/idaho/access*
php yii ipFilter/import/logs '/my/own/private/idaho'

# Will process /etc/httpd/log/access_log-20180603 and /etc/httpd/log/access_log-20180610 ONLY.
php yii ipFilter/import/logs '/etc/httpd/logs' access_log-20180603,access_log-20180610

To see it live, check out https://snooky.biz/visitor

Screenshots!

The main screen ipfilter1

Detail visitor view ipfilter2

Updating the name and/or message for a visitor. ipfilter3

The default blocked user view. (As seen from Tor) ipfilter4

[wiki] An alternative way to ElasticSearch

$
0
0

Hello!

This article is for those who have dealt with the complexity of Elasticsearch or any other indexing machines and are looking for an easier way to index the existing database without additional effort.

Why this post?

The amount of data increases every day. As a result, the search in the databases becomes longer and longer. Conventional data structures must be realigned in order to be able to access information more quickly. There are already database systems like Elasticsearch that can do this. However, such systems also have disadvantages.

The most noticeable major drawbacks are:

  • Learning a new query language. SQL won’t get you far or is not flexible enough.
  • The existing programs must be rewritten in order to process the new result sets appropriately.
  • The safety regulations must be defined again.
  • A second database must be set up, which in principle contains the same data.

Who will benefit from this post?

This information is useful for any programmer who wants to integrate an index database into his existing system in a simple way without additional effort.

The basic idea behind Indexing-machines

We will use this simple Table to demonstrate what an Index-machine does

Tablename: object

UID	TITLE	DESCRIPTION
4711	Rudyard Kipling	If you can keep your head when all about you …
4712	John Magee	I have slipped the surly bonds of Earth and danced the skies on laugher-silvered wings …
4713	Wiliam Wordsworth	Ten thousand saw I at a glance, Tossing their heads in sprightly dance…

With this request we can find very specific texts in this single table:

SELECT ID, Title, Description
FROM object
WHERE Description like '%head%'

But what if we want to find ‚%head%‘ in all tables of our database? We have to write a code to do this job for us. This is inefficent and will work very slowy. The idea behind Elasticsearch and other indexing tables is – so far I understood – to break the strings in single tokens. That means in a very easy way that we have to transform the horicontal order of the table into a vertical order.

Tablename: ncp_index

UID	TABLENAME	FIELDNAME	ID	TOKEN
1001	object	Description	4711	if
1002	object	Description	4711	you
1003	object	Description	4711	can
…				
1010	object	Description	4712	I
1011	object	Description	4712	have
1012	object	Description	4712	slipped
…				

We can tokenize any field of any table of our database into the table ncp_index. Now we can find with a single query very fast any (tokenized) word in our hole database.

SELECT Tablenname, Fieldname, Token
FROM ncp_index
WHERE Token like '%head%'

That is the secret of any Index-Searchengine. Yes, the ncp_index table has a lot of redundant data that we can normalize as follows:

Every field is stored in a system table and has a unique id. let us call it field_id Every content of a field has a lot of same words. These words should be stored only once in a separat words-table.

Our ncp_index table looks now so:

UID	FIELD_ID	ID	TOKEN_ID
1001	123	4711	1
1002	123	4711	2
1003	123	4711	31010	123	4712	4
1011	123	4712	5
1012	123	4712	6
…	
		
Systemtable: fields

UID	TABLENAME	NAME
122	object	Name
123	object	Description
…		

Tablename: word

UID	TOKEN
1	if
2	you
3	can
…	

Some basic examples

/**
 * @author ncp <necips@live.de>
 */
class NCPSearch
{
    /**
     * @param $model
     * @param $tablename
     * @param $fieldnames
     */
    public static function delete_ncp_search_item($model, $tablename) {
        $criteria = new CDbCriteria;
        $criteria->condition = "tablename = :tablename " .
                    "AND id = :id ";
        $criteria->params[":tablename"] = $tablename;
        $criteria->params[":id"] = $model->uid;
        NCPIndexModel::model()->deleteAll($criteria);
    }
    /**
     * @param $model
     * @param $tablename
     * @param $fieldnames
     */
    public static function update_ncp_search_item($model, $tablename, $fieldnames) {
        NCPSearch::delete_ncp_search_item($model, $tablename);
        NCPSearch::insert_ncp_search_item($model, $tablename, $fieldnames);
    }
    /**
     * @param $model
     * @param $tablename
     * @param $fieldnames
     */
    public static function insert_ncp_search_item($model, $tablename, $fieldnames) {
        foreach ($fieldnames as $fieldname) {
            $NCP_index_model = new NCPIndexModel("create");
            $NCP_index_model->tablename = $tablename;
            $NCP_index_model->fieldname = $fieldname;
            $NCP_index_model->id = $model->uid;
            $NCP_index_model->save();
            // a very simple way to tokenize the strings!
            $raw = strip_tags($model->{$fieldname});
            $tokens = explode( ' ', $raw);
            foreach ($tokens as $token) {
                $NCP_token_model = new NCPTokenModel("create");
                $NCP_token_model->NCP_index_uid = $NCP_index_model->uid;
                $NCP_token_model->token = $token;
                $NCP_token_model->save();
            }
        }
    }
    /**
     * @param $models
     * @param $tablename
     * @param $fieldnames
     */
    public static function insert_ncp_search_items($models, $tablename, $fieldnames) {
        foreach ($models as $model) {
            NCPSearch::insert_ncp_search_item($model, $tablename, $fieldnames);
        }
    }
}


// main.php:

// initialize ncp_search table once with all tables which has to be indexed in the main function
NCPSearch::insert_ncp_search_items(UserModel::model()->findAll(), "user", ["login", "mail", "name_last", "name_first"]);
NCPSearch::insert_ncp_search_items(DepartmentModel::model()->findAll(), "department", ["title", "description"]);
NCPSearch::insert_ncp_search_items(ObjectModel::model()->findAll(), "object", ["title", "description"]);
  

// model.php:

class Object : Model
{
  function afterSave()  {
    
    
     // insert this code to synchronize the informations on ncp_index
     if ($this->status === ObjectStatus::DELETED)
            NCPSearch::delete_ncp_search_item($this, "object");
        else
            NCPSearch::update_ncp_search_item($this, "object", ["title", "description"]);       
            
    ...
  }
  
  ...
  
}

Conclusion

These are my basic observations on this subject. These are the first steps to a search-engine that can index existing tables so that informations can be found quickly.

Thanks to

Github

https://github.com/Necip8/ncp_search

I hope this information helps you to build your own super search engine!

Viewing all 3361 articles
Browse latest View live