Quantcast
Channel: Live News for Yii Framework
Viewing all 3361 articles
Browse latest View live

[extension] akiraz2/yii2-stat

$
0
0

Yii2 Multi Web Statistic Module Packagist Version Total Downloads Software License

  1. Features
  2. Installation
  3. Usage
  4. Development
  5. Support
  6. Contributing
  7. Licensing

NOTE: Module is in initial development. Anything may change at any time. На данный момент текущая рабочая версия v0.2 - есть только счетчики яндекса и google и собственный счетчик в DB

Модуль статистики и аналитики для вашего сайта. Много систем на ваш выбор, подключаются либо в конфиге модуля либо в админке:

  • Яндекс-Метрика
  • Google Analytics
  • Liveinternet
  • TopMail
  • Bigmir (для украинской аудитории)
  • Alexa
  • Hotlog
  • Rambler
  • Openstat
  • и даже на выбор собственная система для отслеживания посетителей по их IP-адресам и cookie.

NOTE: Используются самые свежие версии кода счетчика (yandex-metrika2, gtag.js).

Для разработки модуля Yii2 Stat были использованы наработки данных модулей:

Иногда не все посещения сайта фиксируются счетчиками Яндекса или Google. Чтобы посещение точно было засчитано (а это очень важно для отслеживания рекламных источников), используют серверные логи или в нашем случае можно использовать минимально рабочий счетчик на PHP.

Features

  • вы можете использовать внешние сервисы на свой вкус, выбор простым конфигурированием модуля
  • есть собственная простая система сбора статистики
  • данные хранятся в отдельной таблице базы данных или на ваше усмотрение (Redis, etc)
  • статистика формируется на основе уникальных IP адресов посетителей сайта/приложения и Cookie
  • можно посмотреть страну, город, какой браузер и расширение, referer
  • источник перехода (inner, search, direct, ads (from UTM-tags), unknown)
  • отсеивание поисковых ботов (11шт)
  • есть возможность добавления IP, которые не нужны в статистике в черный спискок
  • удобная фильтрация вывода результатов статистики (за день, период, по определенному IP)

Какая информация выводится по каждому отдельному посетителю:

  • его уникальный IP адрес с возможностью получения информации о его местонахождении
  • URL просматриваемой страницы и количество переходов
  • время посещения определенной страницы

Installation

The preferred way to install this extension is through composer.

Either run

php composer.phar require --prefer-dist akiraz2/yii2-stat "dev-master"

or add

"akiraz2/yii2-stat": "dev-master"

to the require section of your composer.json file.

Migration

Migration run

yii migrate --migrationPath=@akiraz2/stat/migrations
Config

Config common modules in common/config/main.php

    'modules' => [
        'stat' => [
            'class' => akiraz2\stat\Module::class,
            'yandexMetrika' => [ // false by default
               'id' => 13788753,
               'params' => [
                   'clickmap' => true,
                   'trackLinks' => true,
                   'accurateTrackBounce' => true,
                   'webvisor' => true
               ]
            ],
            'googleAnalytics' => [ // false by default
                'id' => 'UA-114443409-2',
            ],
            'ownStat' => true, //false by default
            'ownStatCookieId' => 'yii2_counter_id', // 'yii2_counter_id' default
            'onlyGuestUsers' => true, // true default
            'countBot' => false, // false default
            'appId' => ['app-frontend'], // by default count visits only from Frontend App (in backend app we dont need it)
            'blackIpList' => [] // ['127.0.0.1'] by default
            
            // размещаем нашу админ панель на backend с проверкой доступа или ролями (здесь используется dektrium/user)
            'controllerMap' => [
                'dashboard' => [
                    'class' => 'akiraz2\stat\controllers\DashboardController',
                    'as access' => [
                        'class' => \yii\filters\AccessControl::class,
                        'rules' => [
                            [
                                'allow' => true,
                                'roles' => ['@'],
                                'matchCallback' => function () {
                                    return Yii::$app->user->identity->getIsAdmin();
                                },
                            ],
                        ],
                    ],
                ],
            ],
        ],
     ],    

Usage

// переработать

Для перехода на страницу статистики

Development

Please translate to your language! Edit config @vendor/akiraz2/yii2-stat/src/messages/config.php, add your language and run script: `php php ./yii message/extract @akiraz2/stat/messages/config.php ` translate file will be in @vendor/akiraz2/yii2-stat/src/messages/ or your configured path

Support

If you have any questions or problems with Yii2-Stat you can ask them directly by using following email address: akiraz@bk.ru.

Contributing

If you'd like to contribute, please fork the repository and use a feature branch. Pull requests are warmly welcome. +PSR-2 style coding.

I can apply patch, PR in 2-3 days! If not, please write me akiraz@bk.ru

Licensing

Yii2-Stat is released under the MIT License. See the bundled LICENSE.md for details.


[extension] akiraz2/yii2-app

$
0
0

Yii2 Fast Simple Advanced App

  1. Features
  2. Available modules
  3. Installation
  4. Development
  5. Support
  6. Contributing
  7. Licensing

Yii2-app is Fast and Ready-to-production advanced project template.

Default, the template includes three tiers: frontend, backend, and console, each of which is a separate Yii application.

NOTE: Template is in initial development. Anything may change at any time.

Features

  • Admin template is beautiful and simple bootstrap, compatible with yii2 assets: yiister/yii2-gentelella, Demo
  • Yii2 User is strong and proved user-module with many features: dektrium/yii2-user (login adminus, password adminus)
  • Frontend and Backend User Controllers are filtered (by dektrium/yii2-user)
  • Redis cache is really fast (you may change to DB-cache, but don't forget create table)
  • Yii2 queue (DB table queue), but you can use Redis-queue or other yii2-queue docs
  • Queue Manager with backend (/queuemanager/default/index) using ignatenkovnikita/yii2-queuemanager
  • Log DB Target with backend (/log/index) - simply view log messages
  • .htaccess - config for pretty urls (rewrite index.php), may be later add nginx config
  • UrlManagerFrontend for backend app (all url rules in file frontend/config/urls.php, hostInfo in common/config/params.php)
  • i18n translations in common/messages with config
  • ContactForm in frontend app is improved: himiklab/yii2-recaptcha-widget, all email are saved to DB (common/models/EmailForm Model), optionally send message to Viber messenger via bot (install requirements Bogdaan/viber-bot-php and config, uncomment code in Model)
  • postcss config (frontend/web/src/pcss//*.css)
  • Gii generator: added yii2-queue, may be later - schmunk42/yii2-giiant - really steroid, but in development with bugs

Available modules

These modules can be easy installed to Yii2-App using Composer:

Installation

Yii2-app template can be installed using composer. Run following command to download and install Yii2-app: composer create-project --prefer-dist akiraz2/yii2-app my-site After installation run init

Migrations

NOTE: Make sure that you have properly configured db application component and run the following command

php yii migrate/up --migrationPath=@vendor/dektrium/yii2-user/migrations
php yii migrate --migrationPath=@yii/log/migrations/
php yii migrate --migrationPath=vendor/ignatenkovnikita/yii2-queuemanager/migrations/
php yii migrate/up

Development

Messages

Change in common/config/main.php 'language' => 'ru-RU', 'sourceLanguage' => 'en-US', In shell php yii message/extract common/messages/config.php

POSTCSS

Add WebStorm file-watcher, postcss.config.js is ready for use > NOTE: Dont forget install nodejs :) and run command npm install

  1. scope file[mites-site]:frontend/web/src/pcss//*.css
  2. program C:\Users\user4957\AppData\Roaming\npm\postcss.cmd
  3. arguments $ContentRoot$\frontend\web\css\style.css --config $ContentRoot$\post.config.js

Support

If you have any questions or problems with Yii2-App you can ask them directly by using following email address: akiraz@bk.ru.

Contributing

If you'd like to contribute, please fork the repository and use a feature branch. Pull requests are warmly welcome. +PSR-2 style coding.

I can apply patch, PR in 2-3 days! If not, please write me akiraz@bk.ru

Licensing

Yii2-App is released under the BSD License. See the bundled LICENSE.md for details.

[extension] la-haute-societe/yii2-save-relations-behavior

$
0
0

Yii2 Active Record Save Relations Behavior

  1. Features
  2. Installation
  3. Configuring
  4. Usage
  5. Populate additional junction table columns in a many-to-many relation
  6. Validation
  7. Populate the model and its relations with input data

Automatically validate and save related Active Record models.

Latest Stable Version Total Downloads Code Coverage Build Status Latest Unstable Version License

Features

  • Both hasMany() and hasOne() relations are supported
  • Works with existing as well as new related models
  • Composite primary keys are supported
  • Only pure Active Record API is used so it should work with any DB driver

Installation

The preferred way to install this extension is through composer.

Either run

php composer.phar require --prefer-dist la-haute-societe/yii2-save-relations-behavior "*"

or add

"la-haute-societe/yii2-save-relations-behavior": "*"

to the require section of your composer.json file.

Configuring

Configure model as follows `php use lhs\Yii2SaveRelationsBehavior\SaveRelationsBehavior;

class Project extends \yii\db\ActiveRecord {

use SaveRelationsTrait; // Optional

public function behaviors()
{
    return [
        'timestamp'     => TimestampBehavior::className(),
        'blameable'     => BlameableBehavior::className(),
        ...
        'saveRelations' => [
            'class'     => SaveRelationsBehavior::className(),
            'relations' => [
                'company',
                'users',
                'tags'  => [
                    'extraColumns' => function ($model) {
                        /** @var $model Tag */
                        return [
                            'order' => $model->order
                        ];
                    }
                ]
            ],
        ],
    ];
}

public function transactions()
{
    return [
        self::SCENARIO_DEFAULT => self::OP_ALL,
    ];
}

...
/**
 * @return ActiveQuery
 */
public function getCompany()
{
    return $this->hasOne(Company::className(), ['id' => 'company_id']);
}

/**
 * @return ActiveQuery
 */
public function getProjectUsers()
{
    return $this->hasMany(ProjectUser::className(), ['project_id' => 'id']);
}

/**
 * @return ActiveQuery
 */
public function getUsers()
{
    return $this->hasMany(User::className(), ['id' => 'user_id'])->via('ProjectUsers');
}

/**
 * @return ActiveQuery
 */
public function getTags()
{
    return $this->hasMany(Tag::className(), ['id' => 'tag_id'])->viaTable('ProjectTags', ['project_id' => 'id']);
}

} ` > Though not mandatory, it is highly recommended to activate the transactions for the owner model.

Usage

Every declared relations in the relations behavior parameter can now be set and saved as follow: `php $project = new Project(); $project->name = "New project"; $project->company = Company::findOne(2); $project->users = User::findAll([1,3]); $project->save(); You can set related model by only specifying its primary key:php $project = new Project(); $project->name = "Another project"; $project->company = 2; $project->users = [1,3]; $project->save(); ` You can even set related models as associative arrays like this:

$project = Project::findOne(1);
$project->company = ['name' => 'GiHub', 'description' => 'Awesome']; // Will create a new company record
// $project->company = ['id' => 3, 'name' => 'GiHub', 'description' => 'Awesome']; // Will update an existing company record
$project->save();

Attributes of the related model will be massively assigned using the `load() method. So remember to declare the according attributes as safe in the rules of the related model.

Notes:

  • Related models are saved during the EVENT_BEFORE_VALIDATE event of the owner model. Transaction will start at this point according to the transactions() method of the model.
  • Only newly created or changed related models will be saved.

See the PHPUnit tests for more examples.

Populate additional junction table columns in a many-to-many relation

In a many-to-many relation involving a junction table additional column values can be saved to the junction table for each model. See the configuration section for examples.

Note: If junction table properties are configured for a relation the rows associated with the related models in the junction table will be deleted and inserted again on each saving to ensure that changes to the junction table properties are saved too.

Validation

Every declared related models will be validated prior to be saved. If any validation fails, for each related model attribute in error, an error associated with the named relation will be added to the owner model.

For hasMany() relations, the index of the related model will be used to identify the associated error message.

It is possible to specify the validation scenario for each relation by declaring an associative array in which the scenario key must contain the needed scenario value. For instance, in the following configuration, the links related records will be validated using the Link::SOME_SCENARIO scenario: `php ...

public function behaviors()
{
    return [
        'saveRelations' => [
            'class'     => SaveRelationsBehavior::className(),
            'relations' => ['company', 'users', 'links' => ['scenario' => Link::SOME_SCENARIO]]
        ],
    ];
}  

... ` > Tips: > For relations not involving a junction table by using the via() or viaTable() methods, you should remove the attributes pointing to the owner model from the 'required' validation rules to be able to pass the validations.

Note: If an error occurs for any reason during the saving process of related records in the afterSave event, a yii\db\Exception will be thrown on the first occurring error. An error message will be attached to the relation attribute of the owner model. In order to be able to handle these cases in a user-friendly way, one will have to catch yii\db\Exception exceptions.

Populate the model and its relations with input data

This behavior adds a convenient method to load relations models attributes in the same way that the load() method does. Simply call the loadRelations() with the according input data.

For instance: `php $project = Project::findOne(1); /**

  • $_POST could be something like:
  • [
  • 'Company' => [
  • 'name' => 'YiiSoft'
  • ],
  • 'ProjectLink' => [
  • [
  • 'language' => 'en',
  • 'name' => 'yii',
  • 'link' => 'http://www.yiiframework.com'
  • ],
  • [
  • 'language' => 'fr',
  • 'name' => 'yii',
  • 'link' => 'http://www.yiiframework.fr'
  • ]
  • ]
  • ]; */ $project->loadRelations(Yii::$app->request->post());


You can even further simplify the process by adding the SaveRelationsTrait to your model. In that case, a call to the load() method will also automatically trigger a call to the loadRelations() method by using the same data, so you basically won't have to change your controllers.

[extension] kowap/yii2-lightgallery

$
0
0

jQuery lightgallery for Yii2

  1. Installation
  2. Usage

More information about gallery here.

Installation

The preferred way to install this extension is through composer.

Either run

composer require kowap/yii2-lightgallery

or add

"kowap/yii2-lightgallery": "*"

to the require section of your composer.json file.

Usage

Once the extension is installed, simply use it in your code by :

<?php
    echo \kowap\lightgallery\LightGalleryWidget::widget([
        'items' => [
            [
                'thumb' => '../thumb/image_1.jpg',
                'src' => '../big/image_1.jpg'
            ],
            [
                'thumb' => '../thumb/image_2.jpg',
                'src' => '../big/image_2.jpg'
            ]
        ],
        // more options http://sachinchoolur.github.io/lightGallery/docs/api.html
        'options' => [
            'mode' => 'lg-zoom-in-big',
            'download' => false,
            'zoom' => false,
            'share' => false
        ]
    ]);
?>

[extension] dekar91/yii2-datalayer

$
0
0

Yii2 DataLayer helper

This extension is managed to help you fulfill dataLayer variable with initial data on fly. Some Google enhanced e-commerce features are also available.

Installation

Using composer

Add following line in your require section: ` "dekar91/yii2-datalayer": "@stable"

Then, register the component in your application config:
    'dataLayer' => [
        'class' => 'dekar91\datalayer\DataLayer',
    ],

##Configuration


## Usage
### Basic usage
### Enhanced e-commerce
### User-defined senders

[extension] yiimaker/yii2-translatable

$
0
0

24204902

Translatable behavior

  1. Installation
  2. Usage
  3. Tests
  4. Contributing
  5. License

Build Status Scrutinizer Code Quality Total Downloads Latest Stable Version Latest Unstable Version

Translatable behavior aggregates logic of linking translations to the primary model.

Installation

The preferred way to install this extension is through composer.

Either run

$ composer require yiimaker/yii2-translatable

or add

"yiimaker/yii2-translatable": "~1.0"

to the require section of your composer.json.

Usage

  1. Add behavior to the your primary model
public function behaviors()
{
    return [
        // ...
        'translatable' => [
            'class' => TranslatableBehavior::className(),
            // 'translationRelationName' => 'translations',
            // 'translationLanguageAttrName' => 'language',
            // 'attributeNamePattern' => '%name% [%language%]',
            'translationAttributeList' => [
                'title',
                'description',
            ],
        ],
    ];
}
  1. And use getTranslation() or translateTo() methods
// product is an active record model with translatable behavior
$product = new Product();

// sets translation for default application language
$product->title = 'PhpStrom 2018.1';
$product->description = 'Лицензия PhpStrom IDE версия 2018.1';

// gets translation for English language
$translation = $product->getTranslation('en');
$translation->title = 'PhpStrom 2018.1';
$translation->description = 'License of the PhpStrom IDE version 2018.1';

// sets description for French language
$product->translateTo('fr')->description = 'La licence de PhpStorm IDE la version 2018.1';

$product->insert();

translateTo() it's just an alias for getTranslation() method.

After saving the model you can fetch this model from the database and translatable behavior will fetch all translations automatically.

$product = Product::find()
    ->where(['id' => 1])
    ->with('translations')
    ->one()
;

// gets translation for English language
$product->translateTo('en')->description; // License of the PhpStrom IDE version 2018.1
// gets translation for French language
$product->translateTo('fr')->description; // La licence de PhpStorm IDE la version 2018.1

// check whether Ukrainian translation not exists
if (!$product->hasTranslation('uk')) {
    $product->translateTo('uk')->description = 'Ліцензія PhpStrom IDE версія 2018.1';
}

// update Enlish translation
$product->translateTo('en')->title = 'PhpStorm IDE';

$product->update();

Tests

You can run tests with composer command

$ composer test

or using following command

$ codecept build && codecept run

Contributing

For information about contributing please read CONTRIBUTING.md.

License

License

This project is released under the terms of the BSD-3-Clause license.

Copyright (c) 2017-2018, Yii Maker

[extension] yiimaker/yii2-email-templates

$
0
0

24204902

Email templates module

  1. Installation
  2. Usage
  3. Tests
  4. Contributing
  5. License

Extension for creating email templates and managing by using your site dashboard. You can create email templates with CRUD module in your backend or Gii generator.

Documentation is at docs/guide/README.md.

Build Status Scrutinizer Code Quality Total Downloads Latest Stable Version Latest Unstable Version

Installation

The preferred way to install this extension is through composer.

Either run

$ composer require yiimaker/yii2-email-templates

or add

"yiimaker/yii2-email-templates": "~4.0"

to the require section of your composer.json.

Usage

  1. Create template with placeholders using your site dashboard or Gii generator

    ##### Key

    register-notification - this is unique key of this template for using in your code

    ##### Subject

    Notification from {site-name}

    In this example email subject has one placeholder {site-name}

    ##### Body

    Hello, {username}! Welcome to {site-name} :)

    Email body has two placeholders: {username} and {site-name}.

    > All keys should be wrapped by {}.

  2. Now you can get this template in your code

    `php $template = Yii::$app->get('templateManager')->getTemplate('register-notification'); `

    This method returns a template model object.

  3. Then you should parse this template

    `php $template->parseSubject([

    'site-name' => Yii::$app->name,
    

    ]);

    $template->parseBody([

    'username' => Yii::$app->getIdentity()->username,
    'site-name' => Yii::$app->name,
    

    ]); `

    or use another method

    `php $template->parse([

    'subject' => [
        'site-name' => Yii::$app->name,
    ],
    'body' => [
        'username' => Yii::$app->getIdentity()->username,
        'site-name' => Yii::$app->name,
    ],
    

    ]); `

    this methods replace placeholders in template with real data.

  4. Now you can use data of this template in your logic

    `php Yii::$app->get('mailer')->compose()

     ->setSubject($template->subject)
     ->setHtmlBody($template->body)
     // ...
    

    `

Tests

You can run tests with composer command

$ composer test

or using following command

$ codecept build && codecept run

Contributing

For information about contributing please read CONTRIBUTING.md.

License

License

This project is released under the terms of the BSD-3-Clause license.

Copyright (c) 2017-2018, Yii Maker

[extension] yiimaker/yii2-social-share

$
0
0

24204902

Extension for sharing on social networks

  1. Installation
  2. Usage
  3. Tests
  4. Contributing
  5. License

Build Status Scrutinizer Code Quality Monthly Downloads Total Downloads Latest Stable Version Latest Unstable Version

With this extension you can share data from your web pages to any social network! Features: SEO support, default icons for social networks, easy creation of custom drivers for other social networks and more!

Documentation is at docs/guide/README.md.

Extension supports from the box next social network drivers:

drivers for messengers:

and other drivers:

also you can create your driver, it's very simple!

Installation

The preferred way to install this extension is through composer.

Either run

$ composer require yiimaker/yii2-social-share

or add

"yiimaker/yii2-social-share": "~2.2"

to the require section of your composer.json.

Usage

Call widget in view file

<?= \ymaker\social\share\widgets\SocialShare::widget([
    'configurator'  => 'socialShare',
    'url'           => \yii\helpers\Url::to('absolute/route/to/page', true),
    'title'         => 'Title of the page',
    'description'   => 'Description of the page...',
    'imageUrl'      => \yii\helpers\Url::to('absolute/route/to/image.png', true),
]); ?>

Tests

You can run tests with composer command

$ composer test

or using following command

$ codecept build && codecept run

Contributing

For information about contributing please read CONTRIBUTING.md.

License

License

This project is released under the terms of the BSD-3-Clause license.

Copyright (c) 2017-2018, Yii Maker


[news] Gii extension 2.0.7 released

$
0
0

We are very pleased to announce the release of Gii extension version 2.0.7. The release corrects Gii behavior adapting it to changes introduced in version 2.0.15 of the framework. Additionally there are fixes in model and CRUD generators.

[extension] chouaibi/yii2-blacklist-validator

$
0
0

Yii 2 blacklist validator

A Validator that will check if a model attribute is blacklisted.

Installation and usage

Installation
$ composer require chouaibi/yii2-notinarray-validator

or

Add the package to your composer.json file. ` json { "require": {

"chouaibi/yii2-blacklist-validator" : "dev-master"

} } ` then run

$ composer update
Usage

    use chouaibi\validators\BlackListValidator;

    public function rules() {
        return [
            [['attribute'], BlackListValidator::className(), 'array' => ['black','listed','values']],
        ];
    }

With custom message ` php

use chouaibi\validators\BlackListValidator;

public function rules() {
    return [
        [['attribute'], BlackListValidator::className(), 'array' => ['black','listed','values'],'message' => 'The attribute value is reserved. Please check our reserved values ...'],
    ];
}

[extension] apollo11/yii2-logger

$
0
0

Yii2 Custom Logger

  1. Installation
  2. Basic Usage

Sending Yii2 application logs to different targets asynchronously or synchronously.

Installation

The preferred way to install this extension is through composer.

Either run

php composer.phar require --prefer-dist apollo11/yii2-logger "~1.0"

or add

"apollo11/yii2-logger": "~1.0"

to the require section of your composer.json file.

The package offers:

  1. Abstract Target class with support of sending messages asynchronously. It also has possibility to hide sensitive information when sending $_POST or other $GLOBALS data to target.
  2. Slack target: Sending messages to slack channel

Basic Usage

The package supports three target classes: EmailTarget, SlackTarget, DbTarget.

All target classes have support for sending messages asynchronously and hide passwords(or other sensitive data) provided by user. If you set async to true than you must provide the consoleAppPath.

EmailTarget and DbTarget work pretty much in the simillar way as it is described in Yii Documentation.

Add the following code to your project configuration file under components -> log -> targets `php 'class' => , // If async is set to true you have to provide consoleAppPath 'async' => true, 'consoleAppPath' => Yii::getAlias('@console/yii'), // If you would like to use different php binary, when sending messages asynchronously you can set it from here // 'phpExecPath' => 'php', // Provide here keys which will be hidden before sending messages. It is case insensitive 'excludeKeys' => [

'*PASSWORD*', // Will hide all keys from $GLOBALS objects which contains "password".
'*PASSWORD', // Will hide all keys from $GLOBALS objects which ends with "password".
'PASSWORD*', // Will hide all keys from $GLOBALS objects which starts with "password".

], `

SlackTarget
'class' => apollo11\logger\SlackTarget::class,
'except' => ['yii\web\HttpException:*', 'yii\web\HeadersAlreadySentException'],
'webhookUrl' => <Slack channel webhook url>,
'icon_url' => '<Slack sender icon url>',
'icon_emoji' => '<Slack sender icon emoji>', // If both, icon_url and icon_emoji is provided system will use icon_emoji
'levels' => ['error', 'warning'],
'title_link' => '<Url which will be opened when clicking on title of the slack message>',
'async' => true,
'consoleAppPath' => Yii::getAlias('@console/yii'),
'username' => '<Username which will be used as sender on slack channer>',
'excludeKeys' => [],
Important

If you set async property to true, you must add the following code into your console application controllerMap

'async' => [
    'class' => \apollo11\logger\AsyncController::class,
],

[wiki] pjax gridview delete button issue

$
0
0

Normally, after clicking the delete button in gridview, the record will be deleted and the page will refresh, but the page number in query string is lost. This is not always the case we expect.

How to refresh current page with pjax after deleting the record? It seems there is no very simple solution.

1.Controller file

    public function actionDelete($id)
    {
        $this->findModel($id)->delete();
        if (Yii::$app->request->isAjax) {
            Yii::$app->response->format = \yii\web\Response::FORMAT_JSON;
            return ['success' => true];
        }
        return $this->redirect(['index']);
    }

2.index.php(view file)

<?php
    $this->registerJs("
        $(document).on('ready pjax:success', function() {
            $('.pjax-delete-link').on('click', function(e) {
                e.preventDefault();
                var deleteUrl = $(this).attr('delete-url');
                var pjaxContainer = $(this).attr('pjax-container');
                var result = confirm('Delete this item, are you sure?');                                
                if(result) {
                    $.ajax({
                        url: deleteUrl,
                        type: 'post',
                        error: function(xhr, status, error) {
                            alert('There was an error with your request.' + xhr.responseText);
                        }
                    }).done(function(data) {
                        $.pjax.reload('#' + $.trim(pjaxContainer), {timeout: 3000});
                    });
                }
            });

        });
    ");
?>

<?php Pjax::begin(['id' => 'my_pjax']); ?>
    <div class="shop-index">
        <?= GridView::widget([
            'dataProvider' => $dataProvider,
            'filterModel' => $searchModel,
            'columns' => [
                'id',
                [
                    'class' => 'yii\grid\ActionColumn',
                    'buttons' => [
                        'update' => function ($url, $model) {
                            return Html::a('<span class="glyphicon glyphicon-pencil"></span>', $url, [
                                'class' => 'pjax-update-link',
                                'title' => Yii::t('yii', 'Update'),
                            ]);
                        },
                        'delete' => function ($url, $model) {
                            return Html::a('<span class="glyphicon glyphicon-trash"></span>', false, [
                                'class' => 'pjax-delete-link',
                                'delete-url' => $url,
                                'pjax-container' => 'my_pjax',
                                'title' => Yii::t('yii', 'Delete')
                            ]);
                        }
                    ],
                ],
            ],
        ]); ?>
    </div>
<?php Pjax::end(); ?>

[extension] mubat/yii2-inherit-model-behavior

$
0
0

yii2-inherit-model-behavior

Use this behavior to connect inherit ActiveRecord with (one-to-many relation)

In parent ActiveRecord should be column that uses to store ID of inherit ActiveRecord.

Installation

The preferred way to install this extension is through Composer.

Either run php composer.phar require mubat/yii2-inherit-model-behavior "~1.0"

or add "mubat/yii2-inherit-model-behavior": "~1.0" to the require section of your composer.json

Usage examples

  • Simple usage: `php public function behaviors() {

      $behaviors = parent::behaviors();
      $behaviors['image'] = [
          'class' => InheritModelBehavior::class,
          'dependClass' => Image::class,
          'relation' => 'image',
          'linkAttribute' => 'image_id',
          'relationMethod' => 'savedImage',
      ];
      return $behaviors;
    

    }

    /* @return \yii\db\ActiveQuery / public function getSavedImage() {

      return $this->hasOne(Image::class, ['id' => 'image_id']);
    

    }


[extension] mubat/yii2-sitemap-generator

$
0
0

yii2-sitemap-generator

Simple widget for Yii2 framework to generate sitemap.

Support XML format generation.

Support multi language.

Installation

Composer

The preferred way to install this extension is through Composer.

Either run `php composer require mubat/yii2-sitemap-generator`

or add `"mubat/yii2-sitemap-generator" : "~1.0"to the require section of yourcomposer.json`

Widget contains 2 models:

  1. Sitemap - base model. It contains SitemapElement array and methods to generate XML. If $languages array published, model will generate 'alternate' links.
  2. SitemapElement - represents one <url> element. It contains:
    • $loc - requrired - page url (as array). Before insert into XML it will be process by yii2\helpers\Url::toRoute() method.
    • $updated_at - optional - last page update;
    • $changefreq - requrired, default 'weekly' - from class constant.
    • $priority - requrired, default 0.4 - page priority.

[extension] ozerich/yii2-rocketsms

$
0
0

yii2-rocketsms

  1. Installation
  2. Usage

Yii2 component for SMS provider RocketSMS.by

Installation

  1. The preferred way to install this extension is through composer.

    Either run

    php composer.phar require ozerich/yii2-rocketsms "*"
    

    or add

    "ozerich/yii2-rocketsms": "*"
    

    to the require section of your composer.json file.

  2. Add component configuration to your config.php

    'components' => [
        'sms' => [
            'class' => 'blakit\rocketsms\RocketSms',
            'login' => 'your_login',
            'password' => 'your_password'
        ]
    ]

Usage

Send SMS:

try {
    $response = \Yii::$app->sms->send('+375296000000', 'Test Message');
    echo 'SMS sent, message ID is ' . $response->getMessageId();
} catch (ErrorResponseException $exception) {
    echo 'Error sending SMS: ' . $exception->getError();
} catch (InvalidCredentialsException $exception) {
    echo 'RocketSMS credentials are invalid';
}

Check Balance:

try {
    $response = \Yii::$app->sms->balance();
    echo 'Your balance: ' . $response->getBalance() . 'BYN, ' . $response->getCredits() . ' SMS';
} catch (InvalidCredentialsException $exception) {
    echo 'RocketSMS credentials are invalid';
}

Get message status:

try {
    $response = \Yii::$app->sms->status('MESSAGE_ID');
    echo 'Message status: ' . $response->getStatus();
} catch (ErrorResponseException $exception) {
    echo 'Message not found';
} catch (InvalidCredentialsException $exception) {
    echo 'RocketSMS credentials are invalid';
}

[extension] chabibnr/ayom

$
0
0

993323

aYom Project Template (Admin-LTE Yii2 Oauth2 Mimin)

  1. Minimum Penggunaan
  2. Installasi
  3. Konfigurasi
  4. Jalankan Server
  5. DEFAULT USER & PASSWORD

Minimum Penggunaan

PHP 5.4

Installasi

Installasi dengan Composer

Jika kamu tidak memiliki Composer, kamu bisa menginstalnya dengan mengikuti tutorial di getcomposer.org.

Kamu bisa menginstal dengan menjalankan perintah berikut:

php composer.phar create-project --prefer-dist --stability=dev chabibnr/ayom ayom

ATAU ~~~ composer create-project --prefer-dist --stability=dev chabibnr/ayom ayom ~~~

Konfigurasi

Database

Ubah berkas config/db.php dengan data yang sesunguhnya, seperti:

return [
    'class' => 'yii\db\Connection',
    'dsn' => 'mysql:host=localhost;dbname=ayom',
    'username' => 'root',
    'password' => '',
    'charset' => 'utf8',
];

Selanjutnya import database `ayom.sql`

Jalankan Server

php yii serve

DEFAULT USER & PASSWORD

user : admin
pass : admin

user : member
pass : member

[news] Queue extension 2.1.0 released

$
0
0

We are very pleased to announce the release of Queue extension version 2.1.0.

Additionally to fixing bugs, the version brings two major enhancements on board. First, there is now Amazon SQS queue support.

Second, cli\Queue:EVENT_WORKER_LOOP worker loop event was added. It is called on each iteration between requests to queue.

Other than that, there are slightly updated documentation and new Japanese translation.

Full changelog is available at GitHub.

[extension] chabibnr/yii2-change-password

$
0
0

Change Password

  1. Installation
  2. Usage

Simple change password system

Installation

The preferred way to install this extension is through composer.

Either run

php composer.phar require --prefer-dist chabibnr/yii2-change-password "*"

or add

"chabibnr/yii2-change-password": "*"

to the require section of your composer.json file.

Usage

Once the extension is installed, simply use it in your code by :

<?= \chabibnr\changePassword\Form::widget(); ?>

[extension] pceuropa/yii2-menu

$
0
0

Latest Stable Version Total Downloads Latest Unstable Version License

Bootstrap Menu Builder for Yii2

  1. Features
  2. Installation

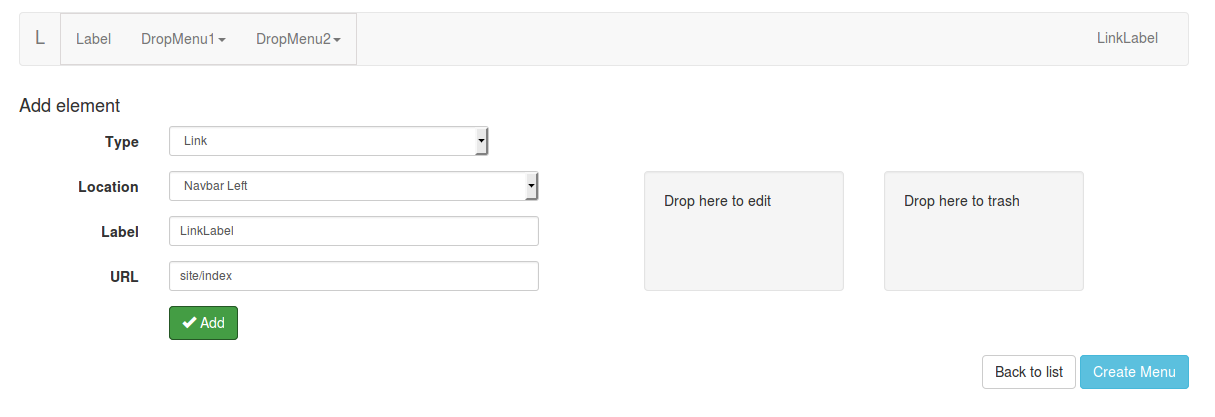
preview

DEMO

Features

  • Creating links, drop menus, line (diver) in the navbar-left and/or navbar-right
  • Sorting, editing, and deleting using drag and drop
  • No jQuery for drag and drop (RubaXa/Sortable)
  • CRUD operations by jQuery Ajax)

Installation

composer require pceuropa/yii2-menu dev-master

Add the following code to config file Yii2 `php 'modules' => [

'menu' => [
        'class' => '\pceuropa\menu\Menu',
    ],
]

## Configuration

### 1. Create database schema

Make sure that you have properly configured `db` application component and run the following command:

```bash
$ php yii migrate/up --migrationPath=@vendor/pceuropa/yii2-menu/migrations

2. Add the following code to config file Yii2

use pceuropa\menu\Menu;

NavBar::begin(['brandLabel' => 'Brand','brandUrl' => Url::home(),]);

echo Nav::widget([ 'options' => ['class' => 'navbar-nav navbar-left'],
					'items' => Menu::NavbarLeft(1)  // argument is id of menu
				]);	
					
echo Nav::widget([ 'options' => ['class' => 'navbar-nav navbar-right'],
					'items' => Menu::NavbarRight(1)
				]);
NavBar::end();

3. Getting started

/menu/creator

[extension] pceuropa/yii2-forms

$
0
0

FormBuilder module for Yii2

  1. Features
  2. Installation Form Builder
  3. Configuration Form Builder
  4. Usage
  5. Full example configuration Form Builder
  6. Form renderer widget
  7. Configure RBAC Component
  8. Tests
  9. ex. Menu

Latest Stable Version Total Downloads License

FormBuilder DEMO

Features

  1. Generate forms, surveys, polls, questionnaires (class FormBuilder)
    • Drag and drop - Sorting, editing, and deleting items
    • CRUD operations by AJAX
    • Built-in RBAC component
  1. Form render widget (class Form)

    • Validation forms (dynamic model)
  2. Storage data submited from form in databases

    • List of forms (GridView)
    • Create database tables after create form
    • Delete database tables after delete form
    • Add table column after add field to form
    • Rename table column after change the name of field
    • Drop table column after delete field in form

Installation Form Builder

composer require pceuropa/yii2-forms

Configuration Form Builder

Make sure that you have properly configured db application component in config file and run the following command: `bash $ php yii migrate/up --migrationPath=@vendor/pceuropa/yii2-forms/migrations `

Add the following code in your configuration file: `php 'modules' => [

'forms' => [
      'class' => 'pceuropa\forms\Module',
 ],

] `

Usage

URLs for the translating tool:

/forms/module/index                    // List of all forms                     
/forms/module/user                     // List user's forms
/forms/module/view                     // Preview form
/forms/module/create                   // Create form - FormBuilder 
/forms/module/update                   // Update form 
/forms/module/delete                   // Delete form

Full example configuration Form Builder

'modules' => [
      'forms' => [
          'class' => 'pceuropa\forms\Module',
          'db' => 'db',
          'formsTable' => '{{%forms}}',
          'formDataTable' => 'form_',
          'sendEmail' => true, 
          'emailSender' => 'info@email.net',
          'rules' => [
                [
                    'actions' => [ 'update', 'delete', 'clone'],
                    'allow' => true,
                    'roles' => ['updateOwnForm'],   // rule only owner can edit form
                ],
                [
                    'actions' => ['user'],
                    'allow' => true,
                    'roles' => ['user'],     // role only authenticated user can see user's forms
                ],
                [
                    'actions' => ['create'],
                    'allow' => true,
                    'roles' => ['@'],        // role only logged user can create form
                ]
            ]
      ]
],

'components' => [
	  'authManager' => ['class' => 'yii\rbac\DbManager',],
]

Form renderer widget

use pceuropa\forms\Form;
echo Form::widget([
     'body' => '[[{"field": "input", "type": "text", "width": "col-md-5", "name": "email", "placeholder": "email"},{"field": "input", "name": "pass", "type": "text", "placeholder": "pass", "width": "col-md-5"},{"field": "submit", "width": "col-md-2", "backgroundcolor": "btn-info", "label": "Submit"}]]',
     'typeRender' => 'php'
     ]);

or ` echo Form::widget([

 'formId' => 1, // equivalennt 'form' => FormModel::findOne(1)->body

]); `

Configure RBAC Component

To use generator console, add fallowing code to console config (console.php) ` 'controllerMap' => [ 'formsrbac' => [

  'class' => 'pceuropa\forms\migrations\RbacController',

], ], `

To use RBAC dont forget add fallowing code to app config (web.php or main.php) ` 'components' => [

  'authManager' => ['class' => 'yii\rbac\DbManager',],

] `

Create rbac tables in the database `yii migrate --migrationPath=@yii/rbac/migrations`

Create RBAC rules and roles. Asssign role user to all users. You can add assign role acction in SignupController `php yii formsrbac/generate`

Tests

Php tests run vendor/bin/codecept run -c vendor/pceuropa/yii2-forms or cd vendor/pceuropa/yii2-forms ../../bin/codecept run

JavaScript tests run On begining install depencies: cd vendor/pceuropa/yii2-forms npm install

run test cd vendor/pceuropa/yii2-forms karma start //or if you use karma localy npm run test

ex. Menu

[
'label' => 'forms',
    'items' => [
        ['label' => 'List of all forms', 'url' => ['/forms/module/index']],
        ['label' => 'User\'s forms', 
            'url' => ['/forms/module/user'],
            'visible' => !Yii::$app->user->isGuest
        ],
        ['label' => 'Create form', 'url' => ['/forms/module/create']],
    ],
],
Viewing all 3361 articles
Browse latest View live